


- Shop
- About us
- DSLocate App
- Your industry
- FAQ
- Blog
- Contact
-
Monitoring for
Guide series | DSLocate – interesting and useful features you may not have known about | #3 Geofences

04.07.2025
Managing a vehicle fleet is no small undertaking. Service schedules, technical condition checks, route monitoring — these are just some of the responsibilities that fall on the shoulders of transport and logistics company owners. Fortunately, DSLocate is here to help — a modern application that makes all of these tasks considerably easier.
Of course, the primary function of DSLocate is real-time vehicle tracking. But that is just the tip of the iceberg! The application offers many other, lesser-known but enormously useful features that can significantly streamline fleet management. In this series of blog articles, we will take a closer look at the untapped potential that lies within DS Locate.
In today's article, we will focus on the Geofences feature, which is sure to be a useful tool in your day-to-day work.
Geofences — precise control over operational areas
Geofences (POI) are defined areas on the map where the date and time of a vehicle's entry and exit are recorded. With DSLocate, you can track when and for how long vehicles are in specific locations, enabling you to generate detailed reports such as the 'Vehicle Visits to Geofence Report' and the 'Visits to Selected Geofence Report'.
Using this feature, you can mark strategic areas on the map that correspond to locations important to your business, such as branches, petrol stations, goods collection points, or warehouses. Geofences give you greater control over fleet logistics and operations, which translates into more efficient management and cost optimisation.
But how does it actually work?
Go to the Map tab, then click the button that expands the additional menu — see the graphic below.
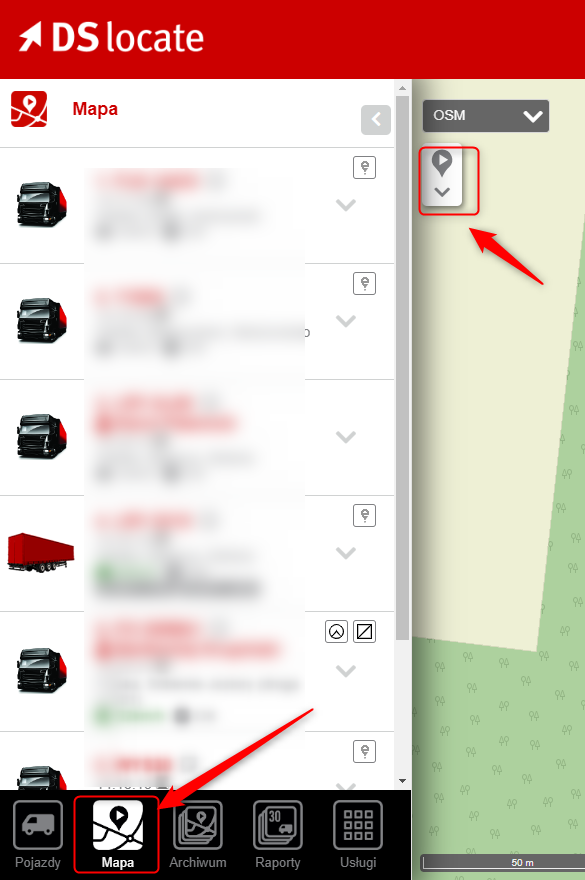
Once the menu is expanded, click the geofence icon — it is usually the middle icon. If you cannot see it, it may not have been activated yet.
What should you do in that case? It is simple — contact technical support and they will activate it within a few minutes. You can do this from within the application by clicking the contact icon in the bottom right-hand corner.
.png)
After opening the Geofences menu, the following view will appear. You have several options here:
- Create geofence manually — this is where you will create your geofences
- Import multiple zones from file — if you have a large number of different locations, you can add them directly by uploading a CSV file. You will also find a template here showing how to create such a file.
- Geofence list — this is simply a list of all active geofences
- Category list — this is where you manage and create new geofence categories. You can place several individual geofences within a single category — for example, various warehouse locations all assigned to a single 'Warehouses' category.
.png)
The first thing to do is create a category. It is very straightforward — simply enter a name and a default geofence radius. Do not worry, this is not fixed — when creating individual geofences within the category, you will be able to adjust it. All that remains is to choose a colour for the category.
.png)
Once you have created a category, it is time to create the individual geofences. You can do this via a file (if you have a large number of them) or via the built-in form.
To use option 2, click “Create geofence manually”. A geofence creation form will expand. From here it is very simple — enter a name, select a category, adjust the radius if needed, and provide a destination point. You can also simply mark the geofence directly on the map.
.png)
And that is essentially it — your geofence has been created. Just don't forget to save it! ?
I have set up my geofences — what now?
If you have successfully created all the geofences you need, congratulations — this is another step towards streamlining and simplifying your work!
You can now monitor which vehicles visited your geofences and at what times. Want to check whether a driver actually left the warehouse at the declared time? Or perhaps you want to confirm that they arrived at a regular client's premises at the scheduled time? This is now a very straightforward task — simply use the 'Visits to Selected Geofence Report' or the 'Vehicle Visits to Geofence Report'. Both can be found under the 'Reports' tab. Good luck!
.png)
DSLocate — more than just location tracking
The geofences module is just one of the many capabilities our system offers. DSLocate is not merely a location tracking tool — above all, it is a comprehensive assistant that will help you manage your vehicle fleet in a more efficient, safer, and more cost-effective way.
We encourage you to try DSLocate and explore all of its possibilities. Contact our team for more information or to arrange an application demo.
In the upcoming articles in this series, we will take a closer look at other interesting DS Locate features that can significantly improve the management of your fleet. Stay tuned!
Are you looking for a trusted GPS and telematics system provider for your business? Get in touch with us today!